Greetings, fellow Californian green thumbs! There’s nothing quite like a sun-ripened, juicy tomato picked fresh from your own garden, right? But the secret to that sweet success? Timing. The question of “When to Plant Tomatoes in California” may seem straightforward, but like a perfectly ripe tomato, it’s a bit more nuanced. It’s about balancing California’s unique climate with the needs of these red beauties. In this post, we’re going to dig into the heart of the matter, peeling back layers of local gardening wisdom to ensure your next tomato crop is your best yet. Welcome to your one-stop guide to the art of tomato timing in our beautiful Golden State.

Understand the California Tomato Growing Regions
Growing tomatoes in California isn’t a one-size-fits-all situation – it’s more like selecting the right surfboard for the right wave. Let’s break down our main tomato havens:
1. Northern California:
Cooler temperatures? Fog? Sounds like Northern California alright! But hey, cooler summers can be great for varieties that prefer less heat, like ‘Early Girl’ and ‘Oregon Spring’.
2. Central California:
This is the Goldilocks zone, folks! Not too hot, not too cold – it’s just right for most tomato varieties. Our state’s tomato belt where most commercial growers hang their hats.
3. Southern California:
Bring on the sunscreen, because we’re hitting SoCal. Hotter and drier conditions make it prime real estate for heat-loving varieties like ‘Heatmaster’ and ‘Solar Fire’.
4. Coastal Areas:
Picture perfect sunsets and… Cooler temperatures? You got it! Coastal areas can enjoy a fresh ‘Stupice’ or a tangy ‘Green Zebra’.
5. Mountain and Desert Regions:
In this wild ride, we’ve got chillier mountain regions and hot, arid deserts. With careful selection and plenty of water, you can pull off a ‘Mountain Princess’ or a sun-loving ‘Sun Gold’.
Remember, while these are general guides, each microclimate can have its own quirks. So keep those green thumbs flexible, and adjust as needed.
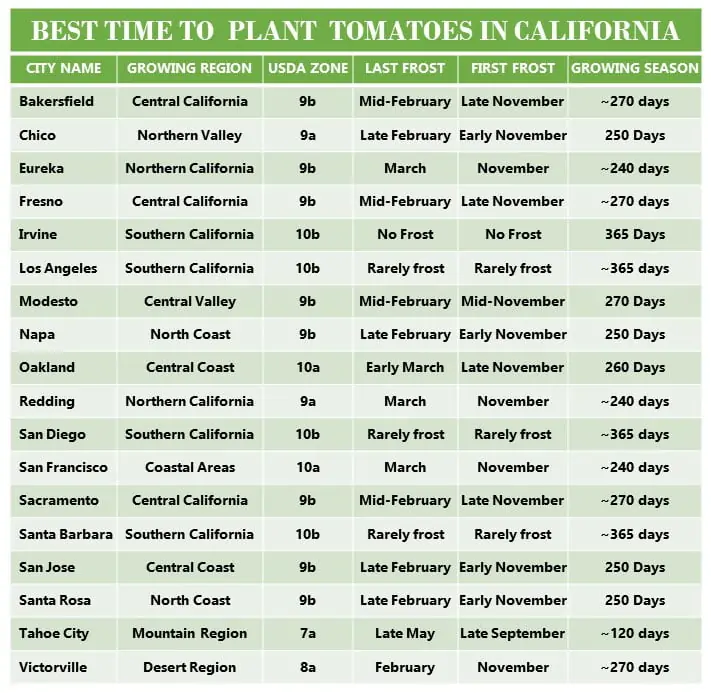
When to Plant Tomatoes in California
While specific conditions may vary somewhat within each region, I can provide a general overview for each region:
1. Northern California (Including Eureka, Redding):
- ⮞ Micro-climate: Wet, mild winters; dry, hot summers
- ⮞ USDA Zone: 9a – 9b
- ⮞ First frost: November
- ⮞ Last frost: March
- ⮞ Average growing season: ~240 days
- ⮞ Start seeds indoor: 6-8 weeks before last frost
- ⮞ Transplant: when soil temperature consistently above 60°F, typically in April
- ⮞ Risk-free transplant range: April through mid-July
2. Southern California (Including Los Angeles, San Diego, Santa Barbara):
- ⮞ Micro-climate: Mild, frost-free winters; warm to hot summers
- ⮞ USDA Zone: 10a – 11a
- ⮞ First frost: Rare
- ⮞ Last frost: Rare
- ⮞ Average growing season: ~365 days
- ⮞ Start seeds indoor: January or can be year-round due to frost-free climate
- ⮞ Transplant: when soil temperature consistently above 60°F, typically in March
- ⮞ Risk-free transplant range: Year-round
3. Central California (Including Bakersfield, Fresno, Sacramento):
- ⮞ Micro-climate: Cool, wet winters; hot, dry summers
- ⮞ USDA Zone: 9a – 9b
- ⮞ First frost: Late November
- ⮞ Last frost: Mid-February
- ⮞ Average growing season: ~270 days
- ⮞ Start seeds indoor: December-January
- ⮞ Transplant: when soil temperature consistently above 60°F, typically in March
- ⮞ Risk-free transplant range: March through mid-October
4. Coastal Areas (Including San Francisco):
- ⮞ Micro-climate: Mild, foggy, and windy, with cool summers and mild winters
- ⮞ USDA Zone: 10a
- ⮞ First frost: November
- ⮞ Last frost: March
- ⮞ Average growing season: ~240 days
- ⮞ Start seeds indoor: January-February
- ⮞ Transplant: when soil temperature consistently above 60°F, typically in April
- ⮞ Risk-free transplant range: April through mid-July
5. Mountain Region (Including Tahoe City):
- ⮞ Micro-climate: Cold, snowy winters; cool, short summers
- ⮞ USDA Zone: 7a
- ⮞ First frost: Late September
- ⮞ Last frost: Late May
- ⮞ Average growing season: ~120 days
- ⮞ Start seeds indoor: March
- ⮞ Transplant: when soil temperature consistently above 60°F, typically in June
- ⮞ Risk-free transplant range: June through mid-July
6. Desert Region (Including Victorville):
- ⮞ Micro-climate: Hot, dry summers; cold winters
- ⮞ USDA Zone: 8a
- ⮞ First frost: November
- ⮞ Last frost: February
- ⮞ Average growing season: ~270 days
- ⮞ Start seeds indoor: December-January
- ⮞ Transplant: when soil temperature consistently above 60°F, typically in March
- ⮞ Risk-free transplant range: March through mid-October
The indoor seed start times and transplanting times are approximations, and the specific timing can depend on a variety of factors, including the specific micro-climate and weather patterns in any given year.
Best Tomato Plant Care Tips for California
Growing tomatoes is a joyful journey, not just a destination. Ready to dive into the thrilling roller coaster ride of tomato plant care? Grab your gardening hats, put on those gloves, and let’s ride!
1. Sun-Soaking Superstars
Tomatoes, like most Californians, love soaking up the sun. Find them a prime spot where they’ll get at least 6-8 hours of sunshine each day. Trust me, nothing gets a tomato blushing like a good ol’ sunbath!
2. Watering Wonders
Tomatoes prefer a deep soak, like a celebrity in a Beverly Hills hot tub. Water deeply and infrequently, allowing the soil to dry out in between. This encourages roots to go deeper into the soil, leading to healthier, more resilient plants.
3. Mulch Magic
Slap some organic mulch around your plants, but avoid touching the stems. Mulch is the VIP pass to a tomato plant’s life – it helps retain moisture, suppress weeds, and maintain a stable soil temperature. Consider it the plant’s personal assistant!
4. Space to Star
Tomatoes need their personal space – just like A-listers on the red carpet! Keep plants 24-36 inches apart so that air can circulate freely, preventing many fungal diseases.
5. Pruning Pros
Your tomatoes will need a bit of grooming to keep them in star-studded shape. Remove suckers (the little shoots that appear in the crotch between the stem and a branch), which can suck energy away from the main plant. But be gentle, my friends – we don’t want a plant scandal! Learn more about pruning.
6. Stake or Cage
Unless you want your tomatoes sprawling all over the ground like a beachgoer on Santa Monica beach, you’ll want to stake or cage them. This keeps your fruits clean and makes them easier to harvest.
7. Rotate, Rotate, Rotate
Don’t plant tomatoes in the same spot year after year. Crop rotation helps keep soil-borne diseases at bay. You wouldn’t wear the same outfit two days in a row, would you?
8. Keep an Eye Out
Keep a close eye on your tomato plants for any signs of disease or pests. Early detection is key to dealing with most issues. Remember, the garden is like a reality show – there’s always something happening!
9. Love and Patience
Finally, the most important tip of all – give your plants love and patience. Just like us, they have good days and bad days. They need time to grow, mature, and produce delicious fruits. It’s like waiting for your favorite TV series’ next season – totally worth it!
How to Prepare Tomato Seeds for California
Get ready for the inside scoop because we’re about to dive into the juicy world of preparing tomato seeds and seed beds the California way.
1. Pick Your Tomatoes Wisely
Our first trick up our sleeve is simple: choose varieties that love our local vibes. Sure, you might love Beefsteak, but maybe ‘Early Girl’ is the one that’s going to rock your garden world.
2. Getting Started Indoors
Okay, this isn’t some dramatic indoor camping adventure, but starting seeds indoors is pretty nifty! About 6-8 weeks before the last frost date, sow your seeds in a well-drained seed-starting mix. Keep them cozy and warm, ideally between 70°-80°F, like a snug tomato burrito.
3. Lights, Camera, Germination!
Once they’ve sprouted, our little seedlings need about 14-16 hours of light daily. A south-facing window can work, but honestly, your seedlings will probably enjoy a glow-up with a simple fluorescent light. Who doesn’t love a good spotlight?
4. The Thinning Ceremony
Once those seedlings have two sets of leaves, it’s time for a little tough love. The aim is to keep the most robust one from each pot. It’s the survival of the fittest, folks!
5. Buff Those Babies Up
A fortnight before you plan to transplant them outdoors, start hardening off your seedlings. Expose them to outdoor conditions for a few hours each day, gradually increasing until they can handle full sun. This is like a baby tomato boot camp.
6. Preparing the Garden Bed
Here in California, we know about making our beds. You want a spot with full sun and well-draining soil. Work in plenty of compost because tomatoes are as fond of a good meal as we are.
7. The Great Planting
Once the soil is reliably above 60°F and all danger of frost is past, your tomatoes are ready to hit the big leagues! Plant them deep, as tomatoes can develop roots all along their buried stems, making them stronger. It’s like tomato strength training.
8. Water Wisdom
After planting, water them well. But don’t spoil them! Tomatoes dislike overly wet feet. Stick to a regular watering schedule, keeping the soil moist but not waterlogged.
How to Transplant Tomato Plants in California
Alright, you’ve successfully nurtured your tiny tomato seeds into strapping seedlings. Now it’s time to give them a proper Californian welcome into the wild, be it ground, raised bed, or planter. Grab your garden gloves, and a sun hat (we’re Californians, we protect our skin), and let’s jump right in!
1. Graduation Day
Once your little ‘mater plants are about 6-8 inches tall and have a few true leaves on their stems, it’s time to introduce them to the wide world of your garden. Don’t rush it though, it’s like moving from kindergarten to university in one step, you’ve got to give them some prep time.
2. Home Sweet Home
Tomatoes are sun worshippers, they need a full day’s sunshine to produce those succulent fruits we love. So pick a spot that’s sun-drenched and roomy. And by roomy, I mean at least 2-3 feet between plants. They need their space to air out and ward off diseases.
3. Soil (not just any dirt)
Just like a Hollywood starlet, your tomato plant loves a good makeup. A well-drained soil enriched with compost or well-rotted manure is like the perfect foundation. Consider it a green carpet welcome for your tomatoes.
4. Deep Dive
Tomato plants can grow roots all along their stems. So dig a deep hole, or if you’re in a raised bed or planter, as deep as you can go. This might seem like tough love, but it’s going to make your plant stronger.
5. Tucking In
Place your seedling in the hole, removing the lower leaves, and bury it deep enough so only the top few leaves are showing. It might look drastic, but your plant will thank you by growing stronger and producing more fruits.
6. A Good Soaking
Once they’re tucked in, give your plants a good, thorough drink. This is California, after all – hydration is key!
7. Keep ’em Cozy
Mulching around your plants will help keep the soil moist and prevent weeds. It’s like giving your plants their very own snuggie!
8. Stake Your Claim
Don’t forget to give your tomatoes a little support. A sturdy stake or cage will keep them off the ground and help them reach their full productive potential.
How to Prepare Soil for Tomatoes in California
Now, we all know a good tomato plant is like a Hollywood star – they love a good spotlight, and they thrive on applause, I mean, uh, proper soil. Let’s get to work preparing your very own ‘Tomato Land.’
1. Location, Location, Location
First things first, find that sun-soaked spot in your garden where your tomatoes can soak up at least 6-8 hours of sunlight daily. Remember, they’re Californian tomatoes – they love to sunbathe!
2. Soil Type Check
Like Californians, tomatoes aren’t picky about where they put down roots, as long as it’s warm and welcoming. Whether it’s sandy in San Diego or clayey in Clayton, the key to good tomato soil is ensuring it’s well-draining.
3. Play the pH Card
Tomatoes prefer their soil like Goldilocks preferred her porridge – not too acidic, not too alkaline, but just right. Aim for a pH of 6.0 to 6.8. If your soil is too acidic, add some lime. If it’s too alkaline, add sulfur or composted organic matter.
4. Dress it Up
Now, you wouldn’t head to a beach party without your best Hawaiian shirt, would you? The same applies to your soil. It needs some dressing up with well-rotted compost or aged manure. This will give your soil that nutrient boost it needs to keep your tomatoes healthy and productive.
5. Diggin’ it
A couple of weeks before planting, get that shovel out and start working the soil. Break it up and turn it over. This is a great way to relieve stress, folks!
6. Crop Rotation, the Tomato Tango
Don’t plant tomatoes in the same spot every year, folks. This practice, known as crop rotation, helps prevent soil-borne diseases. Make sure tomatoes follow beans, lettuce, or another non-nightshade family plant in your garden rotation.
7. Finishing Touches
Just before planting, rake the soil smooth, and if it’s a raised bed or planter, ensure it’s filled to the top. Your soil is now as ready as a well-prepared Oscar host.
The best soil is like a good Californian – relaxed, balanced, and always ready for the next party! Now, go make your tomatoes proud.
How to Fertilize Tomatoes in California
You’ve got your soil prepped, and you’re ready to sow some love into your garden, California-style. Now let’s chat about something very important – feeding those babies right.
1. Basic Nourishment
Before you go wild in the fertilizer aisle, remember this: tomatoes love a well-balanced meal. That’s why a complete fertilizer, one that contains nitrogen (N), phosphorous (P), and potassium (K), is a great place to start. Use a soil test kit to know the present condition of the soil health.
2. Tailor to Your Region
Just like the variety in our California cuisine, our soil across regions varies too! For instance, if you’re gardening in the Central Valley, where soil tends to be rich, you might not need as much phosphorous. But up north in the rocky soils, your tomatoes might need a little extra. So, know your local soil before you fertilize.
3. Climate Considerations
Got a mini heatwave on the horizon? Ease up on the nitrogen. Excessive nitrogen during hot, dry weather can lead to more foliage, fewer fruits, and even encourage pests. We’re aiming for tomato celebrities here, not leafy understudies!
4. Stage-Wise Feeding
- After Transplant, Before Flowering: After moving day (transplanting), your tomatoes need to settle in. During this time, give them a bit more nitrogen to promote leafy growth. But remember, moderation is key, or you’ll end up with tomato plants thinking they’re auditioning for the role of a bush!
- During Flowering: Now, as flowers appear, your plants are ready for their big break. It’s time to cut back on nitrogen and boost phosphorus. This will encourage your plants to put energy into fruit production, not just leafy growth.
- During Fruiting: Keep the phosphorus coming and start adding some potassium into the mix for overall plant health. Your tomatoes will thank you with a red carpet-worthy performance!
- Stop Fertilizing Before Harvesting: When your tomatoes start to ripen, it’s time to stop the dinner service. This will encourage the plant to focus all its energy on ripening those delicious fruits.
5. Timing
Remember folks, more is not always merrier. Over-fertilizing can be just as harmful as under-fertilizing. As a rule of thumb, fertilize every 4-6 weeks during the growing season, but adjust as necessary based on your plant’s performance.
6. And Lastly
Always water well after fertilizing. This helps the nutrients reach the root zone where they can be taken up by the plant. Water is the waiter that serves up the nutrient feast!
The secret to fertilizing is to keep it simple. Know your soil, know your plants, and adjust as necessary. Fertilizing your tomatoes is like surfing – it’s all about balance and adjusting to the waves. So, let’s ride the tomato wave, California-style!
How to Water Tomatoes in California
Let’s chat about how we can quench the thirst of our sun-loving, salsa-providing pals – our tomato plants. So, grab a hose and a sense of humor, and let’s get our tomato babies hydrated!
1. Timing is Everything
Imagine watering your tomatoes is like serving them a cappuccino – you wouldn’t serve it too hot, or too cold, right? Well, tomatoes like their water just right – early in the morning. This gives the water a chance to sink in and reach the roots before the midday heat kicks in.
2. Deep Soak
Tomatoes like a good soak, not a quick dip. Deep watering encourages the roots to grow downward, leading to stronger, and more drought-tolerant plants. Think of it as giving them a mini trip to the local hot springs!
3. Keep it Ground-Level
Remember, tomato leaves prefer California sunshine, not showers! Use a soaker hose or drip system to deliver water to the base of the plant, not the leaves. Wet foliage could lead to fungal diseases. Yep, it’s a little diva-like, but aren’t we all?
4. The Two-Inch Rule
The key to a tomato’s heart? Well-drained soil that’s moist at a depth of about two inches. A good rule of thumb is to water when the top two inches of soil are dry. The two-inch rule, folks, no green thumb needed!
5. Mulch Magic
A nice, thick layer of organic mulch helps retain moisture and keep soil temperatures steady. Think of it as the tomato plant’s favorite wooly sweater, minus the ugly holiday patterns.
6. Less is More
In the case of watering tomatoes, less often but deep is the mantra. Just like Californians savoring a fine Napa Valley wine, our tomato plants prefer their water slow and deep.
7. Drip Irrigation for the Win
Consider using a drip irrigation system for consistent, efficient watering. It’s like their own personal bartender, serving up a refreshing drink directly to their roots.
Common Tomato Diseases in California
As we journey down the sunny Californian gardening path, we often encounter a few bumps. Or spots. Or wilts. That’s right, we’re talking about those sneaky tomato diseases. So, put on your detective glasses and let’s dive into the Top Ten Most Unwanted list in our tomato patches.
1. Early Blight
An oldie but a baddie. Look for brown spots with concentric rings on the leaves. It’s like your plant got a bad tattoo. Solution? Remove infected leaves, use disease-free seeds and rotate crops.
2. Late Blight
This is not a fashionably late party guest. It hits hard and fast, causing grey, moldy spots on leaves and fruit. Avoid overhead watering and plant resistant varieties to keep this blight out of sight.
3. Fusarium Wilt
Your plant’s leaves turn yellow, then brown, then wilt faster than a groom at a shotgun wedding. Avoid this heartbreak by planting resistant varieties and rotating your crops.
4. Verticillium Wilt
Similar to Fusarium Wilt but slower, like it enjoys the drama. Same advice applies here, too. Choose resistant varieties and keep rotating those crops.
5. Tomato Spotted Wilt Virus
Causes spots on leaves and bronzing. It’s like a bad tan on your tomato plant. Control thrips (tiny insects) which spread the disease, and remove infected plants.
6. Bacterial Speck and Spot
Shows up as small dark spots on leaves, fruits, and stems. These are not cute freckles; remove infected plants and rotate your crops to prevent it.
7. Southern Bacterial Wilt
It’s like the plant’s wilting in the southern summer heat. Foliage wilts and dies with no spots or yellowing. Maintain good drainage to prevent this wilt.
8. Septoria Leaf Spot
Small, circular spots with grey centers and dark edges show up on the lower leaves first. Keep your garden tidy, and avoid overhead watering to prevent this baddie.
9. Blossom End Rot
This isn’t a disease but a calcium deficiency, causing black, sunken spots on the fruit’s bottom. Just add lime to increase soil calcium levels. Like adding a bit of lime to your avocado toast!
10. Tomato Mosaic Virus
Causes mottling of leaves. Infected plants should be removed faster than a karaoke machine at a mime convention.
Remember, the best disease defense is a good offense: choose disease-resistant varieties, rotate crops, water correctly, and keep your garden clean.
How to Harvest Tomatoes in California
It’s time to reap what we’ve sown! Gather around, and let’s talk about how we can harvest those red jewels like the pros we are.
Timing is King:
As much as we want to snatch those babies off the vine as soon as they turn red, patience is key. The perfect pick has a uniform color and feels slightly soft when given a gentle squeeze. Just like surfing the perfect wave, timing is everything.
Morning Glory:
Like us, tomatoes are freshest in the morning. Harvesting them before the afternoon sun sizzles will keep your fruits crisp and delicious. Who knew tomatoes were such early birds, right?
Easy Does It:
Let’s face it, we’re Californians, not wrestlers. So, when picking your tomatoes, be gentle. Hold the fruit firmly and give it a twist till it snaps off at the stem. No need for Hulk strength here, folks.
The Chilling Truth:
Don’t put your hard-earned tomatoes in the fridge! Cold temperatures can ruin their flavor faster than a traffic jam on the 405. Store them at room temperature for the best taste.
Stagger Swagger:
Unless you’re planning to open a tomato stand at your local farmers market, staggering your planting can avoid a tomato overload. This way, you’ll have a constant supply of fresh tomatoes without feeling like you’re in a tomato avalanche.
Post-Harvest Spa:
After harvest, keep your tomatoes out of direct sunlight. These divas prefer the shade and can get sunburnt quicker than a tourist in Death Valley.
Popular Tomato Varieties for California
Are you ready to surf the red wave of home-grown tomatoes? With our sun-kissed days and cool Pacific breezes, we’ve got a climate that tomatoes would pay top vine for, if they had pockets… or money. Here in the Golden State, we’re all about choice, whether it’s selecting the perfect wave, the tastiest taco, or the tomato variety that’ll turn your backyard into a farmers market stand. So buckle up your Birkenstocks, because we’re about to take a road trip through the top 25 tomato varieties for our laid-back, left-coast gardens.
- Early Girl: Hybrid, Indeterminate, 50-60 days, VF. Wakes up earlier than a surfer chasing the first wave.
- San Marzano: Heirloom, Indeterminate, 85-90 days. The Fellini of tomatoes – classic Italian.
- Sun Gold: Hybrid, Indeterminate, 55-65 days, Fusarium Wilt. Sweeter than a Hollywood ending.
- Sweet 100: Hybrid, Indeterminate, 65 days, VF. More cherries than a Bay Area start-up.
- Brandywine: Heirloom, Indeterminate, 90-100 days. An old-timey taste that’s more timeless than the redwoods.
- Green Zebra: Heirloom, Indeterminate, 75-85 days. As unexpected and thrilling as an LA traffic jam clearing.
- Beefsteak: Heirloom, Indeterminate, 80-100 days. As substantial as our love for avocados.
- Black Krim: Heirloom, Indeterminate, 69-80 days. As edgy and intriguing as a noir film festival.
- Roma: Heirloom, Determinate, 75-80 days, VF. Turns any kitchen into a Little Italy.
- Cherokee Purple: Heirloom, Indeterminate, 80-90 days. As rich and complex as San Francisco’s history.
- Golden Jubilee: Hybrid, Indeterminate, 70-80 days, VFN. As golden as a San Diego sunset.
- Better Boy: Hybrid, Indeterminate, 70-75 days, VFN. Outdoes the competition like a Silicon Valley innovator.
- Super Sweet 100: Hybrid, Indeterminate, 65 days, VF. Packs more sweetness than a Hollywood rom-com.
- Yellow Pear: Heirloom, Indeterminate, 70-80 days. As cute and sunny as a beach day in Santa Monica.
- Big Rainbow: Heirloom, Indeterminate, 85-90 days. More colors than a Pride parade.
- Celebrity: Hybrid, Determinate, 70 days, VFFNTA. As reliable as a California weather forecast.
- Principe Borghese: Heirloom, Determinate, 70-75 days. For when you’re feeling as fancy as a Napa wine tour.
- Ace 55: Heirloom, Determinate, 80 days, VFA. As trustworthy as a Golden Retriever on a surfboard.
- Mountain Fresh: Hybrid, Determinate, 75 days, FFN. As refreshing as a dip in Lake Tahoe.
- Pink Brandywine: Heirloom, Indeterminate, 85-95 days. Delivers a full-bodied flavor that rivals any Cabernet.
- Rutgers: Heirloom, Indeterminate, 75-85 days, VF. A taste that’s as satisfying as finding the perfect parking spot at the beach.
- Mountain Spring: Hybrid, Determinate, 75 days, VF. As crisp and refreshing as a Sierra snowmelt.
- Jet Star: Hybrid, Indeterminate, 72 days, VF. As fast as a Tesla on the Pacific Coast Highway.
- Grape: Heirloom, Determinate, 60-75 days. Perfectly poppable, like a clutch beach volleyball serve.
- Super Fantastic: Hybrid, Indeterminate, 70 days, VF. As awesome as its name suggests – and then some!
Tomatoes love full sun, so pick a spot that’s more sun-drenched than a Malibu beach house. Keep in mind, Mother Nature may have a say in this, and days to harvest can fluctuate based on environmental conditions.
Conclusion
Alright, California compadres, we’ve traversed the tomato terrain from planting to harvest, and now it’s time to wrap up this saucy adventure. Remember, timing your plantings is as crucial as choosing your surf wave. Pick your tomatoes as carefully as you would pick your avocados, and treat ’em gently, like the precious gems they are. Don’t throw them in the fridge – they hate the cold as much as we do! Keep an eye out for those pesky diseases and remember, the key to a bountiful harvest is knowing your region and acting accordingly. Now, let’s conquer the tomato world, one garden at a time! Happy gardening, Californians!
References:
- https://ipm.ucanr.edu/agriculture/tomato/
- https://vric.ucdavis.edu/veg_info/tomatodisease.htm
- http://vegetablemdonline.ppath.cornell.edu/DiagnosticKeys/TomWlt/TomWiltKey.html
- https://ipmdata.ipmcenters.org/documents/cropprofiles/CAtomatoes-processing.pdf
- https://ipm.ucanr.edu/agriculture/tomato/early-blight/
Leave a Reply